Monday, November 25, 2013

Nail It November: Weekly Mani: Graphic Art

   I've been so busy lately I've barely had time to post! I know I'm behind but here it is:
This week for Nail It November; Weekly Mani; I've decided to try out one of the many kits available to make life a little easier when it comes to having cute tips but not enough time to spend trying different looks. I went for the Graphic Art design, with a pop feel and a hint of nostalgia.
    This kit has everything you need except the top coat. It is made by a company called Fing'rs and it's around $7-$8 depending on the kit you purchase. This brand has a few sub-brands and the brand for the kit I bought is called EDGE, which has a more grown-up feel than their other brand Flirt.

Here is what the kit looks like:
 The kit includes; two shades of nail polish: a newspaper white and a grey, and three designs of nail transfers: newsprint text, bright multi-colored zigzags, and maps. The directions are on the side of the box and are straight forward. You choose whichever color you'd like, paint two coats of said color and allow to dry completely. Once dry you select nail transfer design and dip in water, then press onto nail for 10 seconds. After 10 seconds, slowly peel back the transfer and let dry. Seal with top coat and enjoy!
    I like to mix and match the designs and ended up with this:


    The only downside is that some of the transfers fall apart easily, and you're left with weird pieces- luckily this is easy to disguise with another transfer on top ;) I also think you could cut up the transfer into different shapes and get a more uniform look.

Thank you for checking out this weeks' Nail It November mani- Remember, you only have 5 more days to enter!

Tweet pics via Twitter: @Ladydunn42410

Email: aadunn42410@hotmail.com
Comment with links right here on my blog!
    XOXO, Ashley

Wednesday, November 20, 2013

Just Keep Swiping! Mascara Tips

"Just keep swiping, just keep swiping, swiping, swiping!"

    Today we're talking about mascara and the best tips to achieve the look you crave.

The way mascara looks depends on a few factors:
  •  The brand you buy
  •  How much you use
  •  How you apply it
  •  And of course, your lashes
 The Brand:
    I have to admit, when it comes to mascara, I haven't ventured very far into the vast sea of brands and I've only tried a few different types. Once I find something I like, I'm pretty leary about trying something else.
    Some people swear by spendy brands of mascara, while others- myself included- are satisfied with department store brands. What ever you decide to budget for your mascara needs, most brands are going to deliver good looking lashes.
    The best thing to look for is a formula that doesn't dry out, and wont clump- obvious right? Right. The quicker it dries out, the more uneven your applications will be. I don't even think we need to go over how horrendous clumpy mascara is, luckily eyelash separators help remedy that whenever you do encounter them.
How much and How to:
    I personally love Lash Blast Fusion by Cover Girl, it's a good product and not very costly- around $8 where I live. It goes on easily and has rubber like bristles instead of those like a brush that make it easier to separate lashes for a fuller, more even application. It doesn't clump easily and I like that I can add multiple coats instead of just one. It adds great depth and volume with just one swipe and extra swipes, of course add more depth and volume.
    I like to apply my mascara by starting at the base of my lashes and making a wiggling motion while rolling the wand outward. It may sound like a lot of work but it's worth it. The wiggling back and forth helps to further separate lashes, it's also the same for the rolling.
    After the first coat, I continue the application with three or four swipes- depending on the look I'm going for.
    If I'm going for a more natural look I will just use one coat. If I'm going to work, I go for more impact and add 2-3 coats. On date night, depending on if it's casual or more formal- usually more formal- I go for a more dramatic look. I swipe on 4-5 coats and lightly coat my bottom lashes, as well as using a lash curler.
Your Lashes:
    Every one is born with different lashes; length, color, thickness, and fullness all play a part in how mascara looks on us and how different techniques yield better results than others might.
    Once you have taken a good look at your lashes, it's easy to see what you are working with. That doesn't always mean it's straight forward and with anything- practice makes perfect. It's a good idea to try several different techniques to find what looks best on you, whether you're experienced in make up- or just starting out.

Tips:
  • Try more brands. Don't be shy about trying something new, and try a variety. Some from department stores, and some from make up counters. Different styles of wands and different formulations. You never know what you might find!
  • Look up different techniques and try several. Even if you have a regular routine, it never does any harm to learn something new.
  • Asses your eye lashes, this will help when you try out new brands and techniques for application.
 I hope you enjoy these tips! If you have questions, or additional tips feel free to comment!
Thanks for reading! XOXO, Ashley

Thursday, November 14, 2013

Nail It November: Weekly Mani: Lilac Snow

    For this weeks Nail It November mani, I've decided to go with something simple and understated. The finished look is called: "Lilac Snow". I chose this design because where I am there's fresh snow on the mountains and the mountains themselves look a beautiful shade of purple. Lilac is more relevant to the icy tones of the oncoming winter, however, so I thought it fit perfectly!

    Here is the final product:


To achieve this look I used the following products:
410 I Lilac You by Rimmel London, 101 Snow Me White by Sinful Colors Proffesional and some white iridescent craft glitter.

 -Start with 1-2 coats lilac on each finger and thumb until desired coloring is achieved. I used 2.
 -Then, add a 3rd coat of the lilac on ring finger and quickly pour small amount of glitter over polish to coat well. I recommend putting a piece of paper down to catch the glitter that falls so you can pour it back into the tube afterwards.
 -Using your other index finger, gently dab glitter onto remaining fingers. Note: This should not smudge your polish as the previous applications should be a little more than soft set, although excessive force will cause mistakes.
 -After the purple has dried on your thumb, add a couple coats of the white in your preferred method to achieve a french mani, with lilac tips. I just brush from the base of the nail, up until I've got an amount of lilac showing that satisfies me. After this has also set up for a while, I pressed a little bit of the craft glitter onto the polish.
 -Lastly, add a top coat to all fingers except your ring finger. I haven't added a top coat at all and am fine but you'll want to add it at least on your other nails. If you desire to add something to ease your mind and make the glitter on your ring finger stay put, you can add a few drops onto the glitter. I feel that adding too much of a top coat on this finger takes away from the texture appeal of the amount of glitter.
There you have it! A fabulous look in no time at all.
   I hope you enjoyed this mani as much as I have and I can't wait to see more entries!
Don't forget; you can post links to your blog with your entry, or Tweet them to me! My Twitter handle is @ladydunn42410 You can also email me: aadunn42410@hotmail.com! Keep them coming! We'll pick a winner at the end of this month!
 Thanks for reading! XOXO, Ashley


Thursday, November 7, 2013

Nail It November!!!!

    It's November and you know what that means! Time to rock those new mani designs you've been thinking up because it's Nail It November and I want to see what you've got!
    Last year I asked you to share pics of your hot little digits and this year I'm upping the ante! That's right this is going to be a contest! Every week I'll be posting my latest mani, including a how-to and brief review of supplies used to create the look. I'll be looking over each submission and at the end of the month I'll draw a winner at random.
    One winner will recieve a grand prize; including products from Incoco, OPI, Sally Hansen, Essie, and much more! In addition; two second and third place winners will also be drawn from remaining submissions.
    Submissions can be posted daily; here on my blog via comments, or to my Twitter handle @Ladydunn42410. One submission per day. Contest begins November 7th 2013 and ends 11:59pm PST November 30th 2013.

    I can't wait to see what you come up with!
 Get those submissions in quick!


    Thanks for reading! XOXO, Ashley

Sunday, August 18, 2013

Current Obsession & Summer Staples

    It's seems like summer just started yesterday and now it's already starting to get chillier here where I live. When I broke out my usual summer wardrobe I started thinking that since I've resumed working in retail: I should try to mix up my wardrobe more this summer. That's where working at a trendy boutique really comes in handy ;)
    I got my first pay check I did what any sensible, responsible beauty blogger would do and went shopping! I tried on dozens of flirty sun dresses and flow-y blouses and after a while settled on two dresses.

The 1st one is by Angie and is so much fun to wear! I love pairing it with with light brown gladiator sandals and a simple top knot since the print is so lively and upbeat.


    This dress/tunic is by Love Stitch and I pair it with leggings and canvas shoes. Since it is more understated I love either curling/scrunching my hair and adding a blazer or a statement necklace.
  
    It's nice to spruce up your wardrobe every season, even if you only add a few new pieces to fit in with what you already have. Of some items I consider summer staples, gladiator sandals is a major must have. An easy piece that goes with virtually everything- from sun dresses to cut-offs and maxi dresses. Another summer staple and current obsession; a fitted blazer or jacket. This is one of my favourite articles to throw into my wardrobe because it can also go with anything! Talk about a multi tasking duo! I love to put blazers with my sun dresses if I'm going for a more professional look. Blazers are easy ways to dress up casual wear, or dress down more formal attire. My last two summer staples are belts and chunky necklaces. Never underestimate how easily your outfits will be pulled together by adding either a belt or chunky statement necklace- or both! I love trying to phase these different staples into my wardrobe in different ways. It's fun experimenting with new looks!
    What are your summer staples? Current obsessions? How would you implement these picks into your wardrobe? I'd love to hear your ideas! Until next time! Thanks for reading, XOXO Ashley

Thursday, June 27, 2013

MIA!!!!

    I can't believe the last time I blogged was just over a month ago! I've had a lot going on lately but I'm sorry for going MIA!
    So I guess that means it's time for an update post. Here we go!
  • Back in March my baby turned 1 year old!
  • In April My husband and I celebrated our 3 year wedding anniversary.
  • In May I started working in a hot boutique!
  • And this June I will be heading up the social media department for 4 separate stores!
    In other news I've also gotten an offer to write for a local magazine that puts out two issues a year. I'm going to submit my ideas and see how well that goes over, but I'm excited to say the least!

    Regarding beauty blogging and the like, I've stepped out on a limb and bought a couple new eye-liners that I've never tried before and will be reviewing them soon, as well as a bottle of Essie nail polish in Naughty Nautical that will also be reviewed. In addition, I've added to my wardrobe and will post pictures as soon as I can!
    Thanks for catching up with me I'd love to hear what you've been up to!
 Stay fabulous! XOXO, Ashley

Sunday, May 19, 2013

New Hair Cut! Before and Afters

    Every once in awhile I crave a change in my look, this usually ends up in a haircut or new outfit- this time it was a haircut. Not just any haircut mind you, one I've tried several times but never quite liked the results. I was reluctant to try this style of haircut again since every other time I'd gotten it I ended up absolutely regretting it, yet in spite of that I sat down in the barber's chair and explained what I was looking for and hoped and prayed it turned out at least halfway decent. I was amazed when I was allowed to look at the final work! Finally someone had given me exactly what I wanted and I was ecstatic!

    Rewind and I'll start at the beginning. It all started out with me polling friends on where they went to get their hair done. I was tired of trying chain stores and was hoping to find a great hairstylist. I received dozens of replies and recommendations and after a bit of thought, I decided to go see Darcy at Headlines in Sandpoint, ID and boy am I glad I did. She did a wonderful job. She let me explain what I was looking for, show her the reference picture I had, and she listened gave me her input and set to work. There really isn't much more to explain about it so I'll just let my pictures speak for themselves.

This is what I was looking for, I love the piecey, beachy look and this is exactly what I wanted.
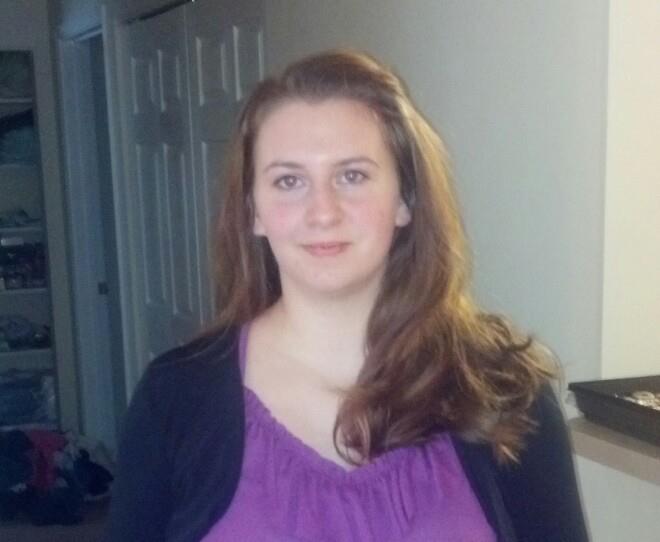
 The before shot
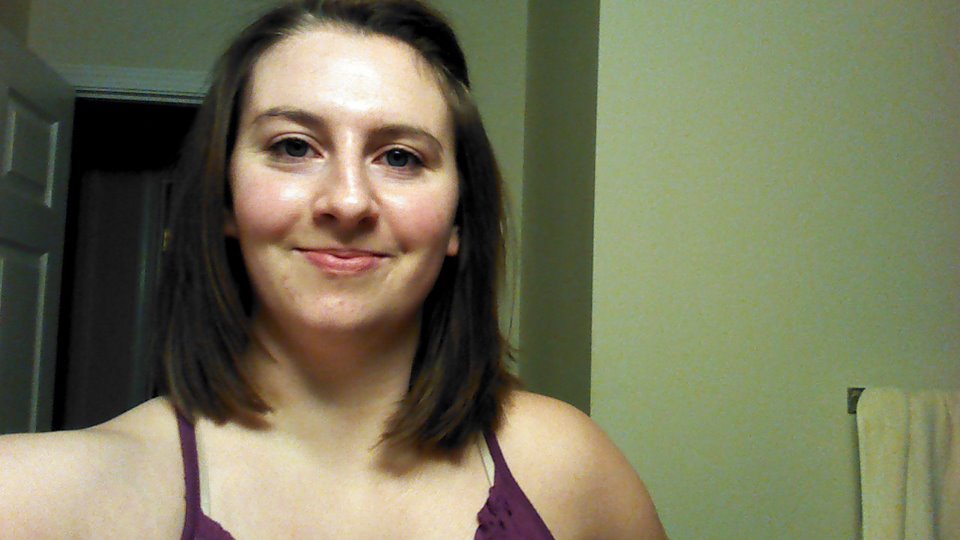
 After my haircut. A pretty drastic change huh?
A bit of color, it's a lot closer to my natural color and I like that.

    My advice for going in to change your look, especially when it is such a difference, is to have a picture. Definitely beyond a doubt, have a picture. It might take a little bit of time to find just what you're looking for, but it is worth it. When you find your picture, study it a little bit and think about what you like the most about it, that way when you go to the salon you can better explain to your hairdresser exactly what you are looking for in a haircut. Showing them a picture is great but since it can be interpreted so many different ways, it's best to have a concise explanation. It can feel like you are being picky or bossy, but if you keep a friendly tone about you, it will be easier. The hairstylist will appreciate your thorough explanation because it decreases the chances that you won't be happy with your haircut.
    Leave room for error and correction. I got my haircut and colored before my anniversary and birthday, but not too close to them that if there was a mistake, or something I'd want to change, I could without worrying about possibly looking bad on those days. If you get an appointment too close to a special occasion or holiday there may not be an appointment available to fix it before hand.
    All in all never be afraid to try something different. If you own it, you'll look good no matter what anyone says. There are people that might not think it looks that great but it's what you think about it that matters, your confidence in yourself is what is important.

 Thanks for reading! XOXO, Ashley